Showing posts with label DIY. Show all posts

DIY Homemade Silhouette

For Christmas I wanted to add a little touch of DIY to some of my gifts. I searched all over the internet to find the perfect gift for certain people and as soon as I found this DIY tutorial, I knew who I was going to make it for.

I decided to make this project for my sister. It was super easy and really fun! The hardest part was finding an oval frame to put the picture in. I plan on remembering this project and using it for myself with my own kids or for future presents.

I found this tutorial over at The Anderson Crew.

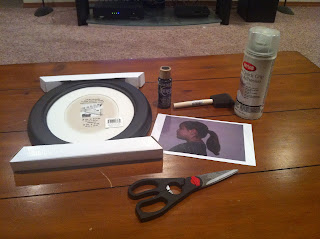
Here is what you'll need:

Oval picture frame (8x10)
spray adhesive
cardstock or regular paper
black paint/paint brush
scissors
picture of the special person (5x7)
 1) Take a picture of person, print it out and cut - This took me a couple of tries, I had to make sure her pony tail was just right and wasn't touching her back, otherwise when I went to cut it out, it looked silly.
 
2) Paint the picture black and let dry - I went over mine a few times, I used regular paper, so it curled at first but after a couple of coats, it laid flat.
3) Once dry, spray the back of the picture with the adhesive spray, center onto white paper that came with frame and attach. (You don't have much time, so it's good to get an idea of where you want it before you press down)

4) Put your frame back together and you're done!
I love the way this project turned out and it didn't take me more then 20 minutes tops. I'm not sure if my sister has put it up yet or not, but I know she loved it when she opened the present.
An Update

I have been slacking big time in the blog world. Since the start of the year, we have been busy and our schedules have been crazier then normal. I think things are finally slowing down and getting back to the norm, or maybe it's just the fact that we can't go anyway because of this crazy weather! Whatever it may be, things are good and life is great!

Since my last post, we found our venue for the wedding and I found my wedding dress! We aren't planning on getting married until 2013, but I couldn't wait to find a dress and when I put this one on, I knew it was the one!  My mom, my sister (Maid of Honor) and one of my bridesmaids went with me last Saturday to try on dresses, we had a great time and they all agreed that the dress I picked was the one! I don't plan on sharing pictures of it or letting people know what it looks like, only because I want to surprise people when I walk down the isle.

I have also started to watch what I'm eating again and I joined a gym. I'm really excited about the new gym; it's an all women's, 24 hour gym. They offer classes which include Zumba (I'm very excited about that!) and have personal trainers. Even though I know my dress fits me right now, I still want to lose some weight so my dress looks amazing on me and I'll feel great on my wedding day.

I am planning on putting some post together of the DIY projects I made as Christmas gifts. I think they turned out great! Those should be up in the next couple of days.

I have the weekend off and I'm looking forward to it! It's always nice to be able to spend time with The Mr., get some work done around the house and more then likely get some good R&R in.

I'll try to be better at posting, but remember, no news is normally good news, right?

DIY Christmas Wreath Tutorial

I went to Hobby Lobby earlier today to find ornaments for our Christmas tree and ended up spending almost an hour and half in the store and walked out with stuff to make a homemade Christmas wreath. I'm a huge fan of wreaths, and I love to change them out throughout the year depending on the season and what not. So far, I've made two of my own wreaths and I plan on making more. They are so fun and so simple!

Here's a quick DIY tutorial on how to make your own homemade wreath! Enjoy!

What you'll need:
1 wreath - your choice on what you use, I enjoy twig wreaths but anything works!
wired ribbon
decorative wire
ornament or decorative sign
holiday embellishments
hot glue gun


Using your hot glue gun, glue a piece of the wired ribbon to the back of the wreath and wrap the ribbon around the wreath:
(I leave a gap in between each wrap so that way I can use the decorative wire in the spaces)


Continue all the way around the wreath:


Next, use your decorative wire and fill the empty spaces:


Like so:


Use the ornaments string and loop it through the twigs in the center and then hot glue the remaining ornament string to the back of the wreath:
(I used a piece of paper (price tag) to make sure the string would stay in place)


Add embellishments!:
(I ended up moving mine around because I could not figure out how I wanted them)


Here's the finished product! So easy, so simple and super cute! It took me less then 30 minutes to make and cost me less then $10 dollars! Thank you Hobby Lobby for your 50% off Christmas decor sale!


I did take the little bit of decorative wire that I had left and used it to make a loop so the wreath would hang better.

I can't wait to decorate for Christmas so I can leave this on our front door but we must wait for Thanksgiving to pass!
BLOG DESIGN BY DESIGNER BLOGS